(continued from General Ledger)
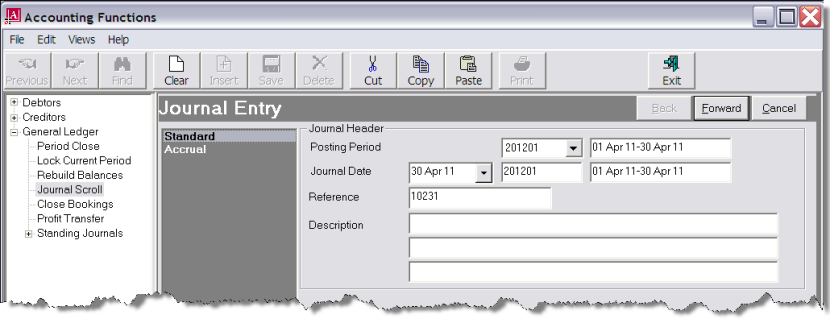
Screen Shot 56: Standard GL Journal Header Fields
Posting Period (Drop-down)
This defaults to the current GL accounting period, but can be changed to any future GL accounting period. This is the GL accounting period that the account(s) in the GL journal will receive the debit or credit. The beginning and end dates of the selected period display to the right of the Posting Period.
Journal Date (Date)
The journal processing date. This defaults to the last day of the current period, but can be changed to be any date in any open GL accounting period. When the date is changed into a different period, the Journal Period to the right of the date field will change to show the Journal Period and the beginning and end dates of the selected period display to the right of the Journal Period.
|
|
If the Journal Date Period is later than the current GL accounting period, the journal transactions will not be visible, nor will the balances of the GL accounts be updated. This will occur when the journal date period becomes the current accounting period. |
Reference (20 Chars)
A manual Journal Reference can be entered.
|
|
If required, GL INI fields can be set to automatically generate journal references and optionally have reference prefixes and/or suffixes attached which can be user specific. |
Description
Up to three lines of description can be entered.
|
|
The first description line also defaults to each line within the journal as the first line by line description. |
Forward
To continue, click the Forward button in the Journal Entry Bar.
Screen Shot 57: Journal Line Detail Dialogue
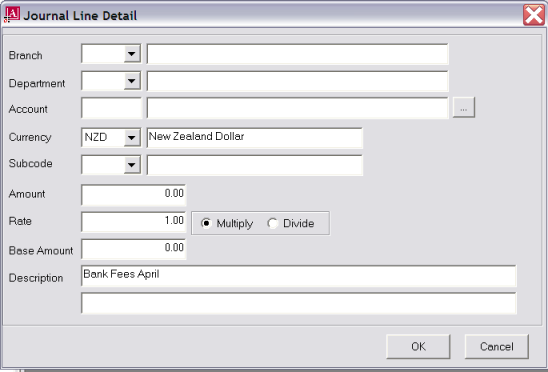
This screen dialogue is used to enter the individual lines into the journal. After it has been completed for each line, and OK has been clicked, it will automatically re-display awaiting entry of data for the next journal line. When all lines have been entered and this dialogue re-displays, click the Cancel button to complete the journal.
Branch/Department/Account (Drop-downs; 6 Chars)
These three fields are used to select a GL account to be debited or credited in this journal line. Alternatively, clicking the Browse button ( ) next to the account field will display the list of GL accounts.
Currency (Drop-down)
By default, system base currency displays. If this journal line is to be in a different currency, select the currency to use from the drop-down list.
|
|
Journals can have lines with different currencies in them—i.e., there can be a debit line in USD and a credit line in AUD. Provided the net balance of the journal is 0.00 in base currency, any combination of currencies are able to be used in a single journal. |
Sub code
If foreign currency sub codes are being used, select the correct code.
Amount
Enter the debit or -credit amount of this line. A positive amount is a debit and negative amount is a credit.
Rate
If a currency other than base currency has been selected for this line, the exchange rate from the Tourplan currencies table will have defaulted to this field. The rate can be edited here if required.
Multiply/Divide (Radio Button)
The exchange rate can be shown as either a multiplier or divisor by clicking the appropriate radio button.
Base Amount
This is the foreign currency in the Amount field converted at the exchange rate in the Rate field to base currency. This amount can be manually edited.
|
|
If the base amount is edited, the foreign currency amount in the Amount field will change, using the exchange rate in the Rate field. |
Description1 and 2 (60 Chars each)
The first description field from the Journal Header is defaulted into the first line description, but can be edited or overridden here.
OK
To continue, click the OK button on the dialogue. The screen will re-display to allow entry of further lines.
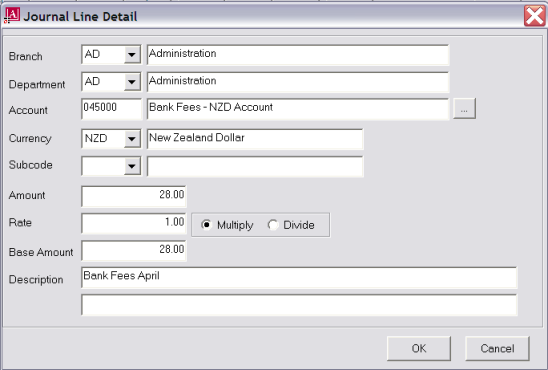
Screen Shot 58: GL Journal–Debit Line
Screen Shot 59: GL Journal–Credit Line
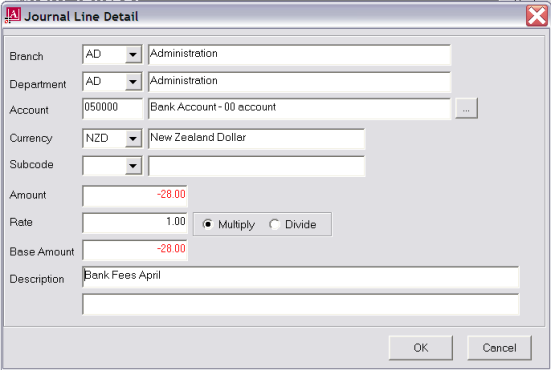
Screen Shot 58: GL Journal–Debit Line and Screen Shot 59: GL Journal–Credit Line show debit and credit lines of a simple standard journal. There is no limit to the number of lines that a journal can have, although it should be remembered that a journal is generally entered for a specific purpose—i.e., it would not be practical to enter bank fee journal lines in a journal for (e.g.) wage and salary postings.
When all lines have been entered into the journal, click the Cancel button on the Line dialogue. The journal lines and header display, still in the New Journal screen.
Screen Shot 60: New Journal Lines Screen
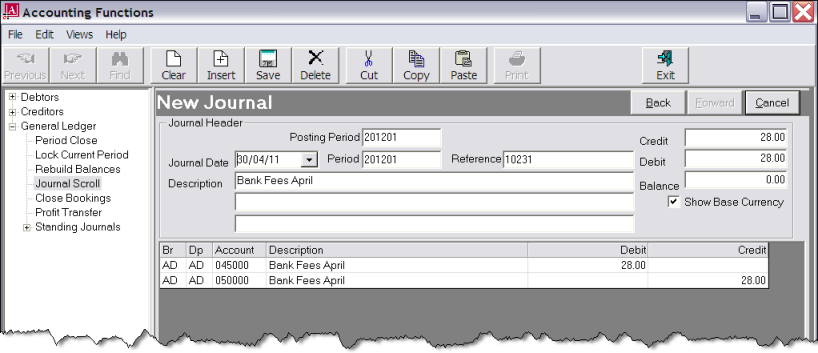
From this screen, existing lines can be edited and additional lines can be added to the journal.
|
|
The Dates/Periods can be changed prior to the journal being saved—i.e., whilst the header bar shows New Journal. When the journal has been saved, the header bar shows Alter Journal and only the header descriptions and the journal lines can be edited. |
|
|
To edit an existing journal line, double click it. |
|
|
To add new journal lines, click the Insert button in the button bar. The Journal Line dialogue as in Screen Shot 57: Journal Line Detail Dialogue will re-display. |
|
|
The Balance field at the top right of the screen must be 0.00 before the journal can be saved. |
Save
To save the journal, click the Save button in the button bar.
When the journal has been saved, the Journal Scroll screen as in Screen Shot 52: Journal Scroll Screen displays.
(continued in Accrual Journal Entry)
 Tourplan iS V2.07 Accounts 2 Training Guide
